
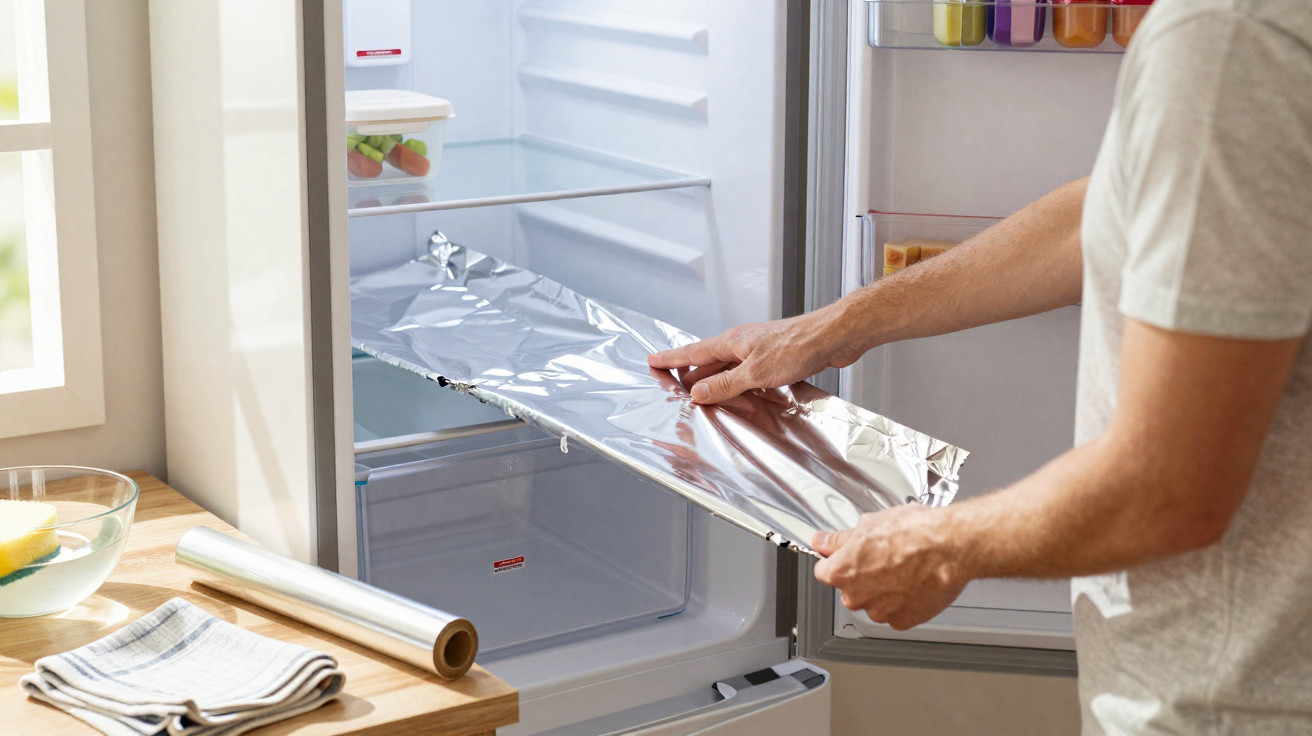
Anyone who opens their freezer knows the scene: thick sheets of ice on the walls, drawers that won’t budge, and hardly any usable space left. Many people put off defrosting for months. A simple hack using ordinary aluminium foil can make maintenance much easier - while quietly saving both money and wear on the appliance.
Why ice in the freezer turns into a real power drain
Each time you open the door, warm, damp air rushes in. That moisture settles on the icy inner surfaces and freezes. Layer by layer, an ice crust builds up - and it’s not just annoying; it has very real consequences.
"The thicker the layer of ice, the harder the compressor has to work - and the higher your electricity bill will be in the end."
Ice behaves like an extra insulating layer. Cold air reaches the inside less effectively, so the freezer has to run for longer and more often to maintain the target temperature. That pushes energy use up and, over time, puts extra strain on the mechanics.
There’s also a second issue: when ice collects around the seals or along the front edge, the door may stop closing properly. Even a tiny gap is enough for warm air to seep in continuously. That intensifies the cycle - more moisture, more ice, and more electricity consumed.
Food stored at the back can eventually vanish under frost. Packaging tears when you pull it out, bags freeze in place, and containers can warp. What should be a handy storage helper turns into a constant irritation.
Why traditional defrosting is so unpopular
It’s no surprise so many households keep delaying defrosting. The routine is a slog: empty the appliance, unplug it, wait for hours, catch the water, then scrape at the ice. After a busy day, hardly anyone wants that job.
To speed things up, some people reach for a kitchen knife or rigid scrapers. That’s risky. One wrong jab can damage the interior lining or puncture lines - and in the worst case, the freezer is ruined afterwards.
"The real underlying problem is how firmly ice sticks to the plastic walls - and that’s exactly where the aluminium foil trick comes in."
How aluminium foil tackles stubborn frost
Ice bonds especially well to rough, slightly porous surfaces. The inside walls of many freezers may look smooth, but over the years they often pick up fine scratches from drawers, baskets, and tools used during defrosting. Frost can lock into those microscopic grooves.
Aluminium foil, by contrast, provides a very smooth, sealed surface. The key idea is this: ice will still form, but it can’t grip the wall as tightly. Instead, it sits on the foil and can later be peeled away like a loose layer.
"The aluminium foil acts as a protective layer: the ice sticks to the foil, no longer directly to the freezer compartment."
Step-by-step: how to fit aluminium foil correctly inside the freezer
Preparation: without thorough drying, the trick won’t do much
To get a noticeable result, you need a bit of prep. If you apply foil to damp or icy surfaces, you’ll quickly run into problems: it comes loose, forms bubbles, and tears.
- Empty the freezer completely and store food elsewhere temporarily (for example, in a cool bag or, in winter, outside in a sheltered spot).
- Switch the appliance off and allow existing ice to melt in a controlled way.
- Soak up meltwater with towels and dry the interior carefully - including corners and seams.
Only when everything is genuinely dry is it worth moving on.
Cutting and applying the foil
This is the straightforward part. Standard household aluminium foil is perfectly adequate.
- Cut sheets so they cover the back wall, the upper area, and any spots that tend to frost up.
- Smooth the foil down with your palm and gently push out trapped air.
- Fold the edges over slightly and press them down so the foil is less likely to lift when loading and unloading.
- Do not cover slots, vents, or sensors, so air can continue to circulate.
It doesn’t have to look flawless. What matters more is keeping creases to a minimum and ensuring nothing sticks out or rattles.
How the foil makes the next defrost much easier
Over time, ice will build up again - but it won’t cling nearly as strongly. Later on, instead of laborious scraping, a quick pull is often enough:
- Loosen the foil from one corner and peel it back slowly.
- Most of the ice drops off or breaks away with it.
- Let any remaining bits melt briefly, wipe the surface, apply fresh foil - done.
"Many users report that the time spent defrosting is cut by more than half once they protect the walls with foil."
Another benefit: the interior surfaces are protected from scratches. Without foil, hard tools repeatedly leave score marks where even more ice will latch on in future. The foil layer prevents that exact kind of wear.
How often should you replace the foil?
The protective layer doesn’t last forever. Temperature changes, moisture and movement make it brittle over time. A rough guide is to replace it every few months, or whenever:
- the foil is torn,
- it has become very wavy,
- unusually large amounts of ice are hanging in specific areas.
It’s handy to keep a roll of aluminium foil near the freezer. That way you can swap it out on the spot - for instance after the weekly shop, when you’re already rearranging the contents.
Where the trick helps most inside the freezer compartment
In many appliances, the thickest ice forms in particular zones:
- along the upper interior area,
- on the back wall,
- directly around the cooling lines or evaporator sections.
If you’re short on foil, prioritise these areas. Over time, a pattern usually becomes clear: every freezer has its typical trouble spots. Once you know yours, you can place the foil precisely where it delivers the biggest impact.
Saving electricity by opening the door less and organising stores better
The foil trick works on the appliance itself. If you also adjust a few habits, you can slow ice build-up even further.
- Label frozen items so you don’t have to search for long.
- Store similar products together (for example, vegetables in one drawer, bread in another).
- Only freeze what you realistically expect to use over the coming months.
- Open the door briefly and avoid leaving it ajar.
Every shorter door opening means less moisture entering the compartment - and therefore fewer frost layers forming.
Risks, limits and sensible add-ons
This method has limits. In No Frost appliances with forced air circulation and automatic defrosting, aluminium foil is often unnecessary - and could even interfere with airflow. With those models, it’s worth checking the manual before lining the walls.
With older chest freezers, take care not to cover ventilation slots, drains, or temperature sensors. Otherwise the thermostat may read inaccurately, and energy use can rise despite the foil.
If you want to be extra cautious, combine several simple steps:
- apply aluminium foil to the critical surfaces,
- clean the door seals regularly and check for cracks,
- avoid placing the appliance right next to a radiator, cooker or dishwasher,
- inspect and reorganise the freezer at least once a year.
Why reaching for aluminium foil pays off in the long run
The material cost is tiny, but the day-to-day effect is noticeable: fewer ice crusts, quicker defrosting, and a lower risk of damaging the interior. Once people try it, they often make it part of their regular household routine.
Over the lifespan of a freezer, the combination of shorter run times, reduced wear and tear, and manageable upkeep can save many pounds. At the same time, your stores stay easier to see, food is simpler to remove, and last-minute cooking plans aren’t derailed by drawers frozen solid.
A small strip of aluminium foil won’t transform your entire household, but it can take much of the dread out of one of the most tedious kitchen jobs - with just a few quick steps and no specialist tools.




Comments
No comments yet. Be the first to comment!
Leave a Comment