
Whether you wear them with a dress, tailored trousers or jeans, white trainers have long been a staple of everyday outfits. That makes it all the more annoying when winter weather, rain and city dust leave little more than a grey, stained version of their former brilliance. Many people automatically put them in the washing machine – but that is exactly what can damage them over time. A far gentler approach uses two inexpensive ingredients and delivers better results than any machine wash.
Why the washing machine quietly damages white trainers
Heat, moisture and the drum: hard on glue and stitching
A 30°C delicate cycle may sound harmless, but it is not for trainers. Inside the drum, they repeatedly knock against metal and other garments, while heat and prolonged dampness affect their materials.
“The combination of friction, heat and moisture weakens the sole adhesive and puts stress on the stitching.”
The adhesive joining the sole to the upper softens and gradually loses its grip. Stitching is pulled in directions it was never designed to withstand. Your shoes may look improved immediately after washing, yet their usable life is considerably reduced. The sole can later come away without warning, or cracks may appear in the upper material.
The illusion of cleanliness: stains are pushed deeper in
There is another issue with this supposed deep clean. Water penetrates deep into fabric or faux leather and can push dirt particles further in rather than draw them out. Once the trainers dry, those familiar yellowish tide marks can then develop.
Detergent residue can also remain lodged in the fibres. It attracts dust and street grime almost as if by magic. The result is that the shoes look clean briefly, then become stained again even faster. What seemed like a time-saving solution turns out to be counterproductive.
The natural power duo: white shoes without harsh chemicals
Bicarbonate of soda: a gentle scrub with a brightening effect
The better option relies on two straightforward household products that are often already in the kitchen. The first is bicarbonate of soda, also commonly sold as baking soda. Its fine crystals act like an exceptionally mild scouring powder.
- lifts dirt particles from leather and fabric
- brightens slightly yellowed areas
- neutralises odours inside the shoe
Its fine texture cleans thoroughly without roughening the surface. The white shade looks noticeably fresher afterwards, without the material being scrubbed away.
Black soap: tackles grease while conditioning the material
Soft black soap in paste form is the second ingredient. It is generally made with vegetable oils, such as olive oil or linseed oil. This traditional soap is particularly effective on greasy, stubborn marks, including road dirt, barbecue grease, tar residue and grass stains.
“Black soap removes stubborn stains while its oils keep the material supple.”
Unlike aggressive cleaners, it does not dry out leather or faux leather. The surface remains flexible and takes on a lightly conditioned finish rather than becoming dull and brittle.
The ‘paste power’ method: mix the cleaner in two minutes
Only a few spoonfuls are needed for one cleaning batch:
- 2 tablespoons bicarbonate of soda
- 1 tablespoon black soap (soft paste)
The right texture: toothpaste rather than liquid soap
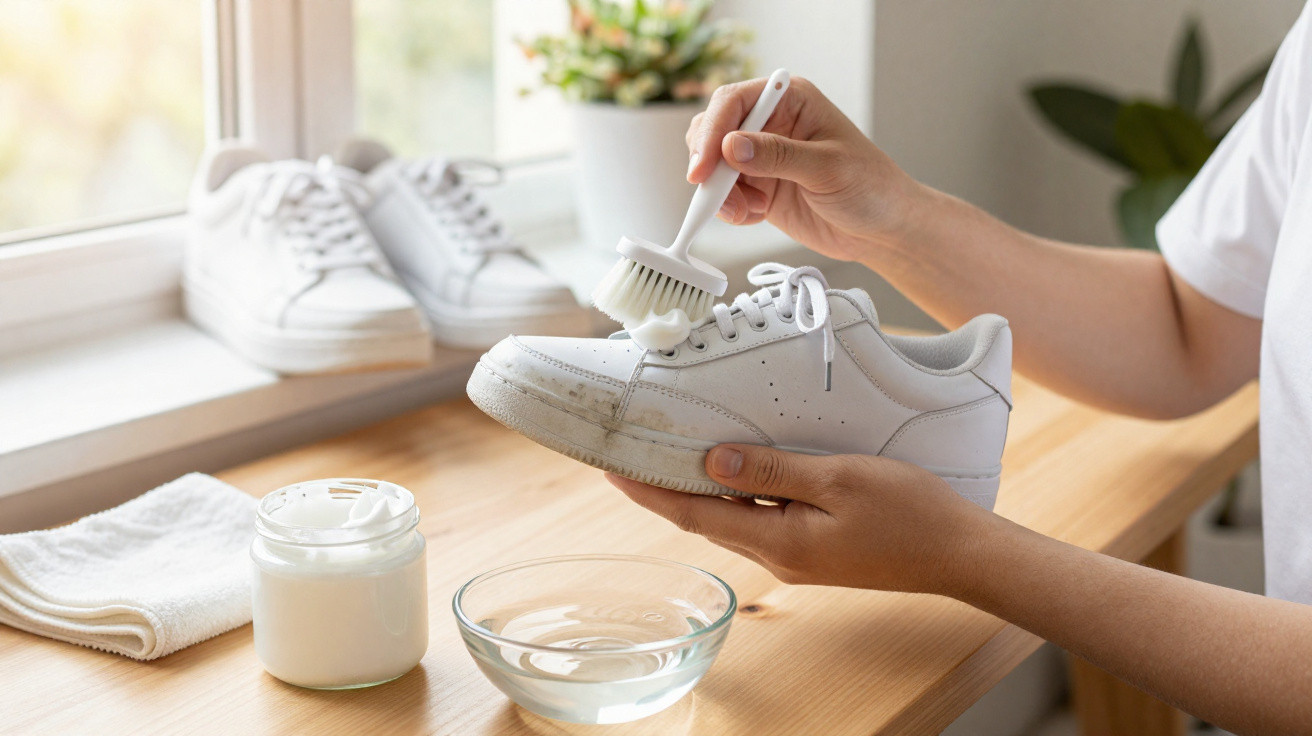
Put both ingredients into a small bowl, then stir them well until they form an even, thick paste. It should resemble firm shaving cream or thick toothpaste, rather than a runny sauce.
If the mixture is too thin and starts to run, simply add a little more bicarbonate of soda. It may foam slightly at times, which indicates that the mixture is working. This thick consistency offers one key benefit: it stays on the surface instead of saturating the entire structure of the shoe with water.
Why using as little liquid as possible matters
The wetter a trainer becomes, the greater the chance of rippling, misshaping and yellow tide marks as it dries. The paste keeps moisture to a minimum and works mainly at the surface.
“The thick paste cleans precisely where the dirt is, without soaking the whole shoe.”
This helps the shoe retain its shape and prevents unnecessary damage to the material.
How to apply the paste correctly
Key trouble spots: soles, creases and toe caps
An old toothbrush or a soft nail brush works well for applying the mixture. Either one lets you reach narrow grooves and work around stitching.
Pay particular attention to:
- the rubber sidewall of the sole, especially where it meets the upper
- crease lines above the toes, where grey dust tends to collect
- the toe cap, which often shows fine scratches and road scuffs
Pick up a small amount of paste and work it in using small circular motions. Avoid pressing too hard; instead, go over the same area several times. Even grey grime marks along the sole can lift surprisingly quickly this way.
Leaving time: a face-mask effect for shoes
Once the entire shoe has been treated, leave the paste on the surface for around 15 minutes. During this period, the black soap loosens oil and grease residue, while the bicarbonate of soda brightens and neutralises light discolouration.
“Letting the shoe rest as though it were wearing a mask means far less scrubbing later.”
This resting stage is especially useful for heavily worn trainers. For particularly stubborn marks, repeat the process a second time.
Wiping and drying properly – the crucial final step
No running water: use a microfibre cloth instead
After the waiting time, it is time for the gentle equivalent of a rinse cycle. Do not hold the shoes under running water; wipe them clean instead with a lightly dampened microfibre cloth.
- dampen the cloth, then wring it out thoroughly
- remove the paste using steady strokes
- rinse the cloth well at intervals
This removes residue in a controlled way without soaking the trainers. It is worth making a second pass around seams and sole edges in particular, so that no white crumbs are left behind.
Air, not radiators: patience while drying
Patience is essential at this stage. Avoid direct sunlight, radiators and hairdryers. They can encourage yellow tide marks again and make faux leather crack more quickly. A shaded, well-ventilated spot at room temperature is a much better choice.
“Stuffed with paper, trainers dry faster, keep their shape and look less creased afterwards.”
Loosely fill the shoes with newspaper or tissue paper. It draws moisture from the inside while also helping the footwear hold its shape.
How to keep your trainers white for longer
Waterproofing as an invisible protective shield
Once the shoes are clean and fully dry, a waterproofing spray is worthwhile. It forms an almost invisible layer over the material, stopping water and dirt from penetrating deeply.
Apply the spray evenly from a distance of 20–30 centimetres and allow it to dry thoroughly. Fabric trainers in particular stay looking fresh for much longer because stains have less opportunity to set.
A quick routine after every wear
Anyone who loves white shoes should give them a few seconds of attention after every substantial outing. A brief check when taking them off is often enough:
- wipe away light splashes with a damp cloth
- clean sole edges with a dirt-eraser rubber
- do not leave shoes in a sunny hallway
Small marks are removed before they develop into stubborn stains. This avoids more intensive cleaning sessions and keeps that ‘fresh out of the box’ appearance for considerably longer.
What to consider with leather, fabric and faux leather
Check the material before you begin
Not every trainer responds in the same way. Smooth leather copes well with the paste, but it should be cleaned using only light pressure. With very delicate, soft leathers, test the mixture first in an inconspicuous area.
Fabric trainers, including canvas styles, can usually be brushed a little more firmly. Faux leather is generally hard-wearing, but it can crack quickly when exposed to heat, which makes gentle drying particularly important.
Common mistakes that harm shoes
- abrasive scouring pads that permanently scratch the surface
- chlorine or bleach products, which can make materials brittle and yellow
- fully soaking shoes in buckets or the bath
By avoiding these pitfalls and using the bicarbonate of soda and black soap paste instead, you achieve more than a better-looking result. The shoes last longer, need replacing less often and, as a welcome side effect, reduce both spending and the pile of discarded footwear in the wardrobe.

Comments
No comments yet. Be the first to comment!
Leave a Comment